
IWantTo.Review Setup
The best way to increase the number of positive reviews is to ask your guests. We have built IWantTo.Review to help you encourage guests to leave a review after their visit.
You can find IWantTo.Review in the left-side menu. The tool allows you to create a landing page that you can later share with your guests.
Navigation
You can create a landing page directly in our software, including all additional features. Once you make changes, the landing page will be updated in real time.
Your landing page receives its own web address: https://iwantto.review/your-business. You can share this web address, or URL, with your guests in various forms, including via QR code, post-stay emails, NFC cards, and links in emails or social media.
To create your IWantTo.Review page, follow the tabs in the menu to the left of the preview from 1 to 5, with tab 5, Categories, being optional.
As soon as you make changes, the green button “Page is up-to-date” changes to red and “Publish changes.” This reminds you to save or publish your changes.

Name and URL
Define how your business name should be written. As soon as you make changes in the field, the landing page updates in real-time. The shortname is how your business name appears in the URL (web address). You can share this URL with your guests. When you change the shortname, the system immediately tells you whether the shortname is available, and the URL slug is updated.
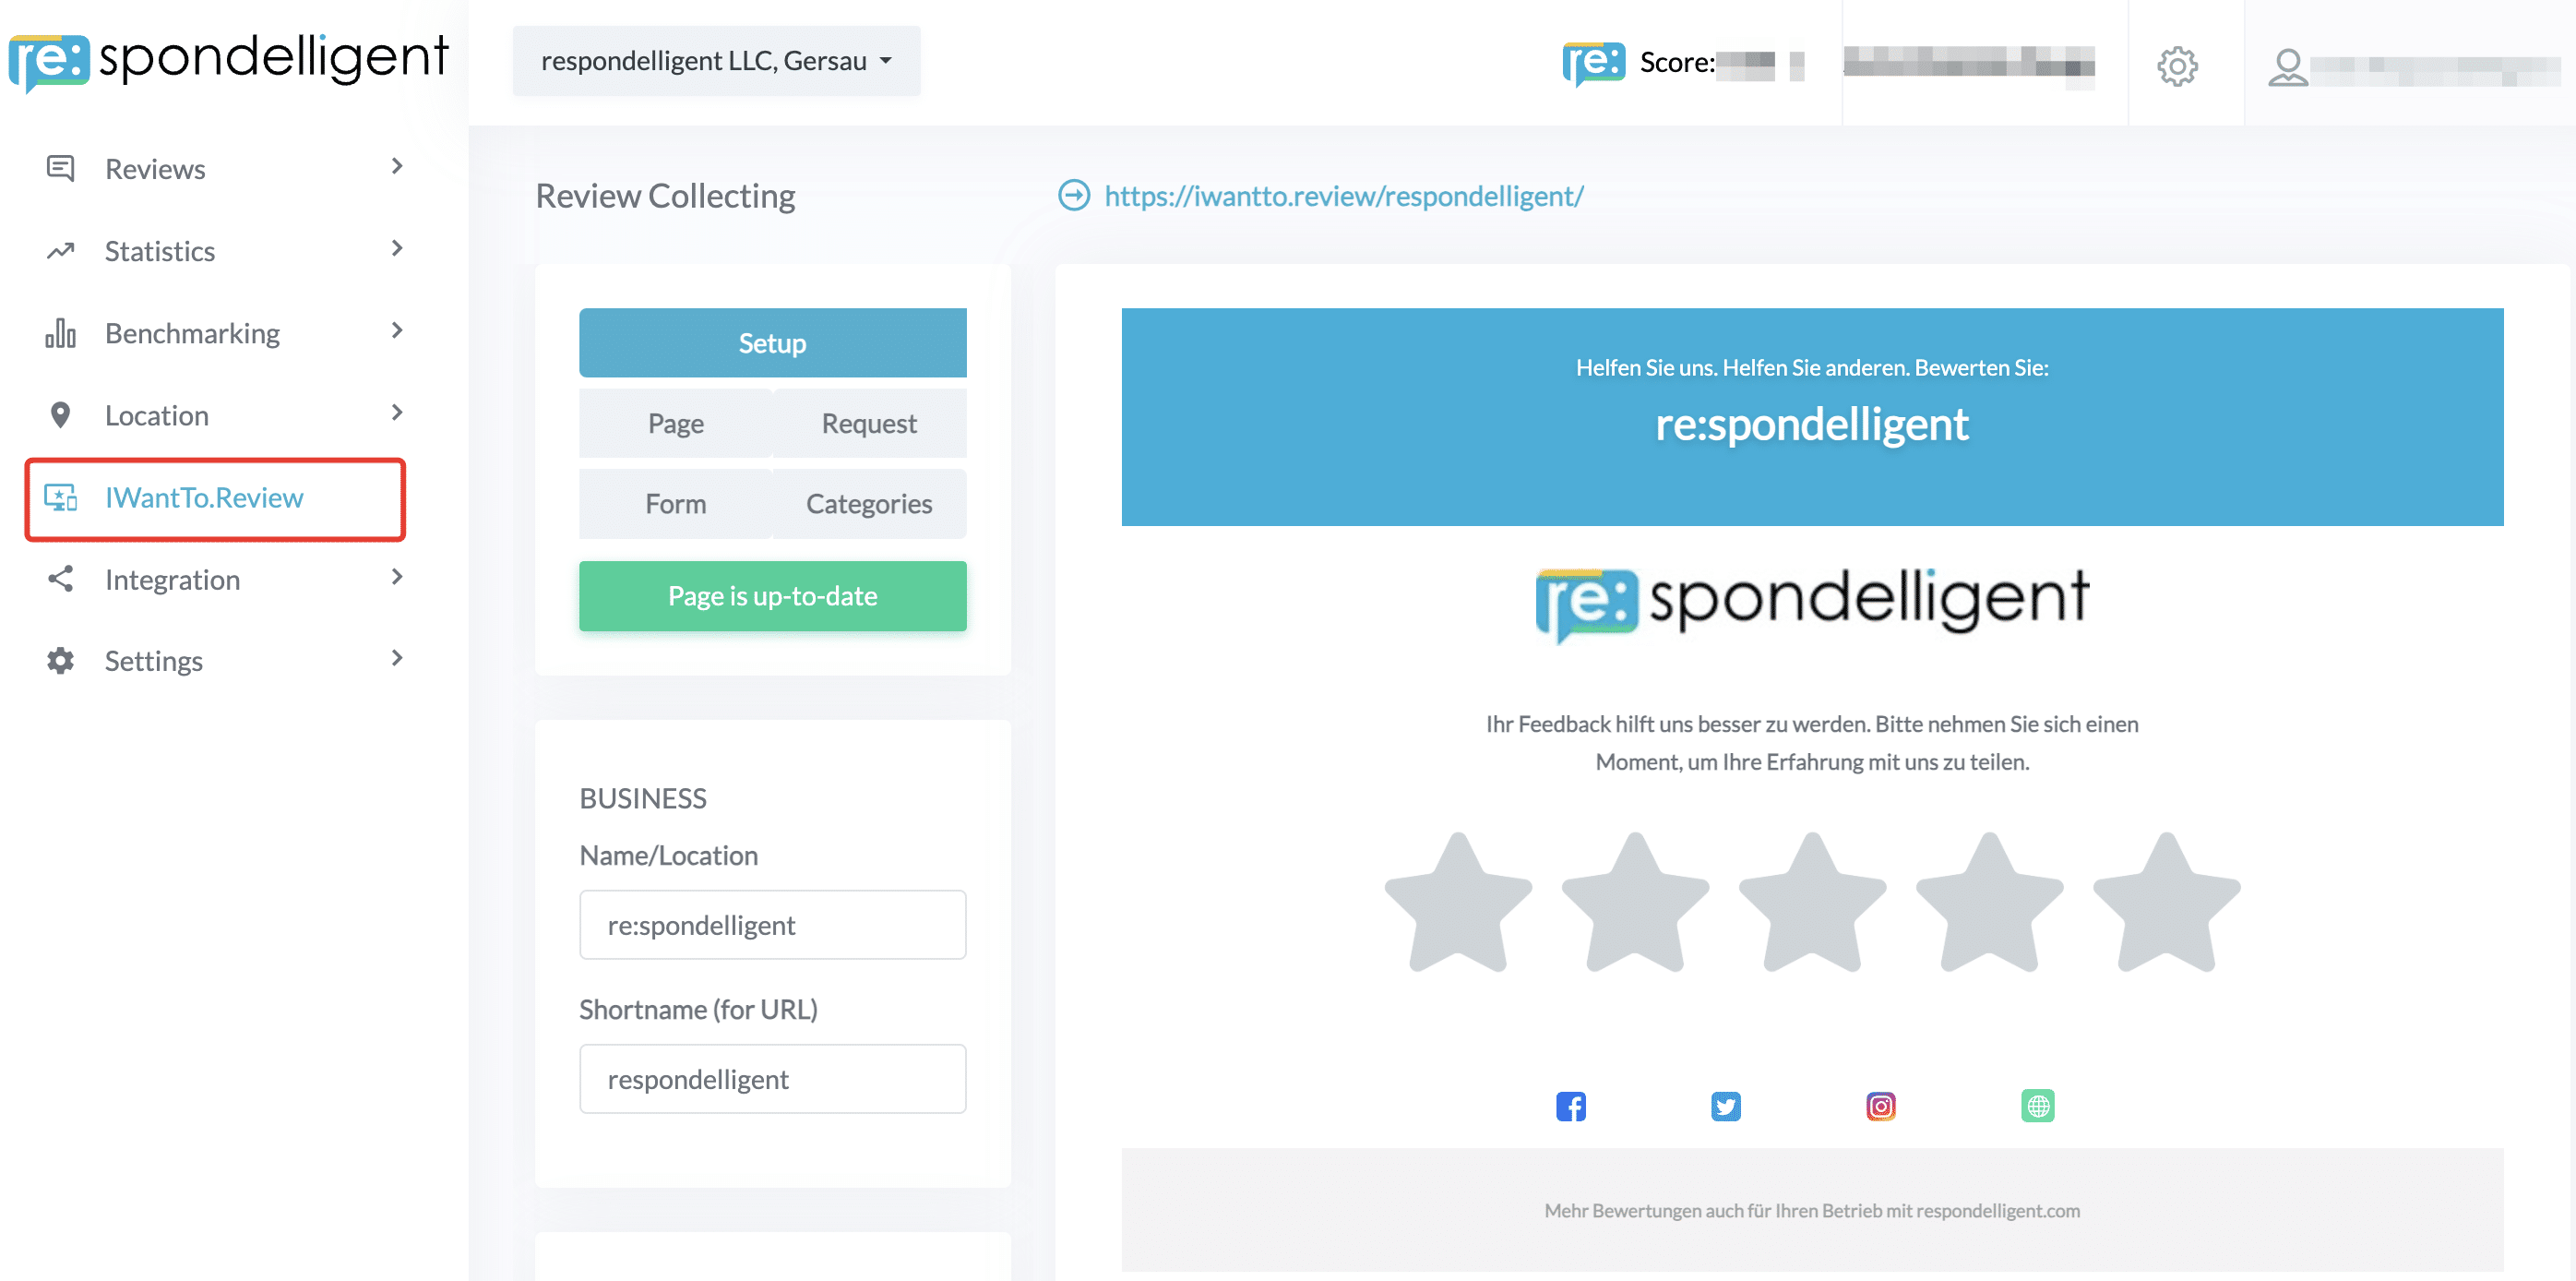
The rating that guests leave on IWantTo.Review page will be saved in re:spondelligent app, but you can also forward your guests to the review platforms of your choice. It makes sense if the rating is good. Therefore, scroll down to Review Site Listing, start typing, and choose the name of the review site from the drop-down list. You can add those platforms which are connected in the app.
Furthermore, here you can define which social links you would like to show on your landing page. Add the URLs to the relevant boxes, the icons will immediately appear under the star rating. You can also untick the box if you don’t want to add any social media links.
Don’t forget to publish changes.
QR Code
re:spondelligent automatically creates a QR code for your landing page. You can download it in two file formats: PNG and SVG.
Optionally, you can add tracking parameters to your URL and QR code. This gives you the following advantages:
- You’ll see these parameters later in re:spondelligent and can track where the review came from. This provides greater transparency and valuable insights, as you can export this data and analyze it further, for example, if you’re running a team challenge.
- You’re completely free to enter whatever you want in the four different parameter fields, and you can also leave individual fields blank. However, we’ve used Google’s UTM parameters in the background. This means if you integrate your IWantTo.Review page with Google Analytics, you can also analyze the parameters there, along with your other online campaigns.
Campaigns and Tracking
To collect feedback efficiently and understand which touchpoints drive the most engagement, IWantTo.Review allows you to build trackable campaigns. By adding UTM parameters to your landing page URLs, you can measure exactly where guests are clicking and which placements generate the most reviews.
Your IWantTo.Review landing page URL is not indexed by search engines, making it perfect for controlled distribution. You can share it directly in newsletters, on social media, or through QR codes to request guest feedback.
Prerequisites: Before campaign tracking will work, you must connect your Google Analytics account to re:spondelligent. Learn how to set up the Google Analytics integration.
Creating a Campaign
- In IWantTo.Review Setup, tick “Tracking Parameter UTM”
- Click “Create a campaign”

- Configure your UTM parameters:
- Campaign: Name your campaign to identify specific marketing initiatives (e.g., “Summer_Promotion”)
- Source: Track where the QR code or link is placed (e.g., “menu”, “receipt”, “flyer“)
- Medium: Specify the marketing medium (e.g., “qr_code”, “email”, “social_media”)
- Campaign ID: Add a unique identifier for detailed tracking (e.g., month or year like “2025_12”)
- As you add parameters, the URL updates automatically.
- Important: Click “Publish changes” to save your campaign
- Download your QR code. Two formats are available: PNG and SVG.
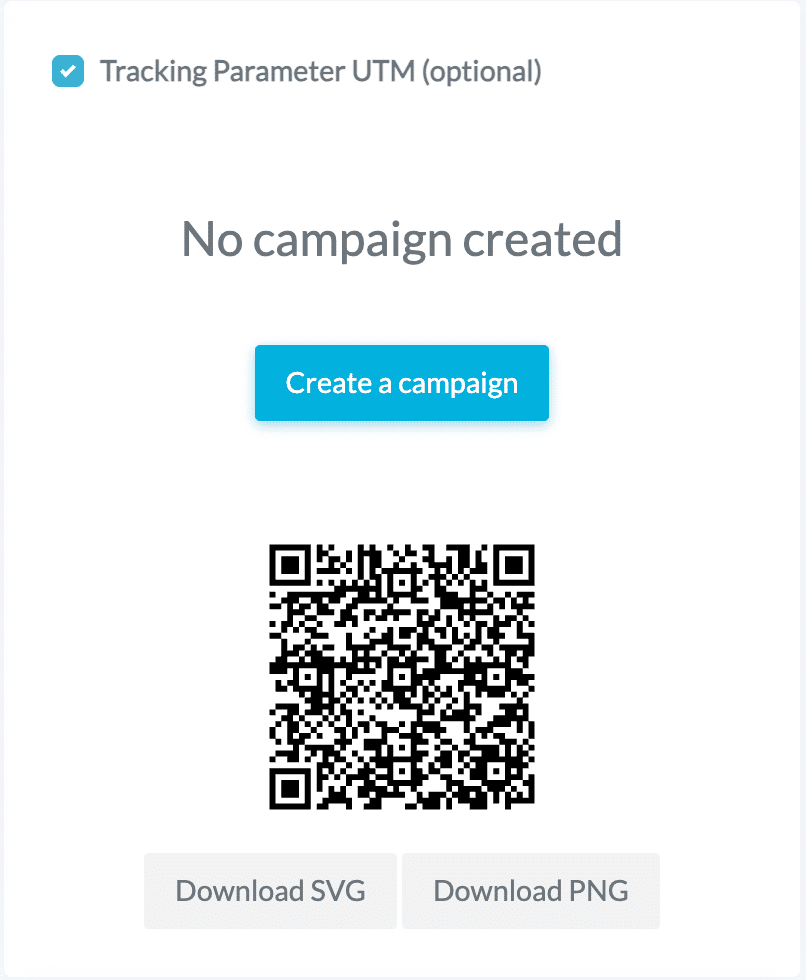
We recommend PNG if you want to share the QR code electronically, for example, via a landing page or social media. We recommend SVG if you want to print the QR code, for example, on business cards.
You can also copy the trackable URL directly for use in digital channels.

To access your list of campaigns, click the three-line menu icon in IWantTo.Review. Here you’ll find all your saved campaigns and can create new ones or edit existing campaigns.

In re:spondelligent app, we save the information coming from the UTM codes. You will see the data under IWTR Rating or IWTR Form.
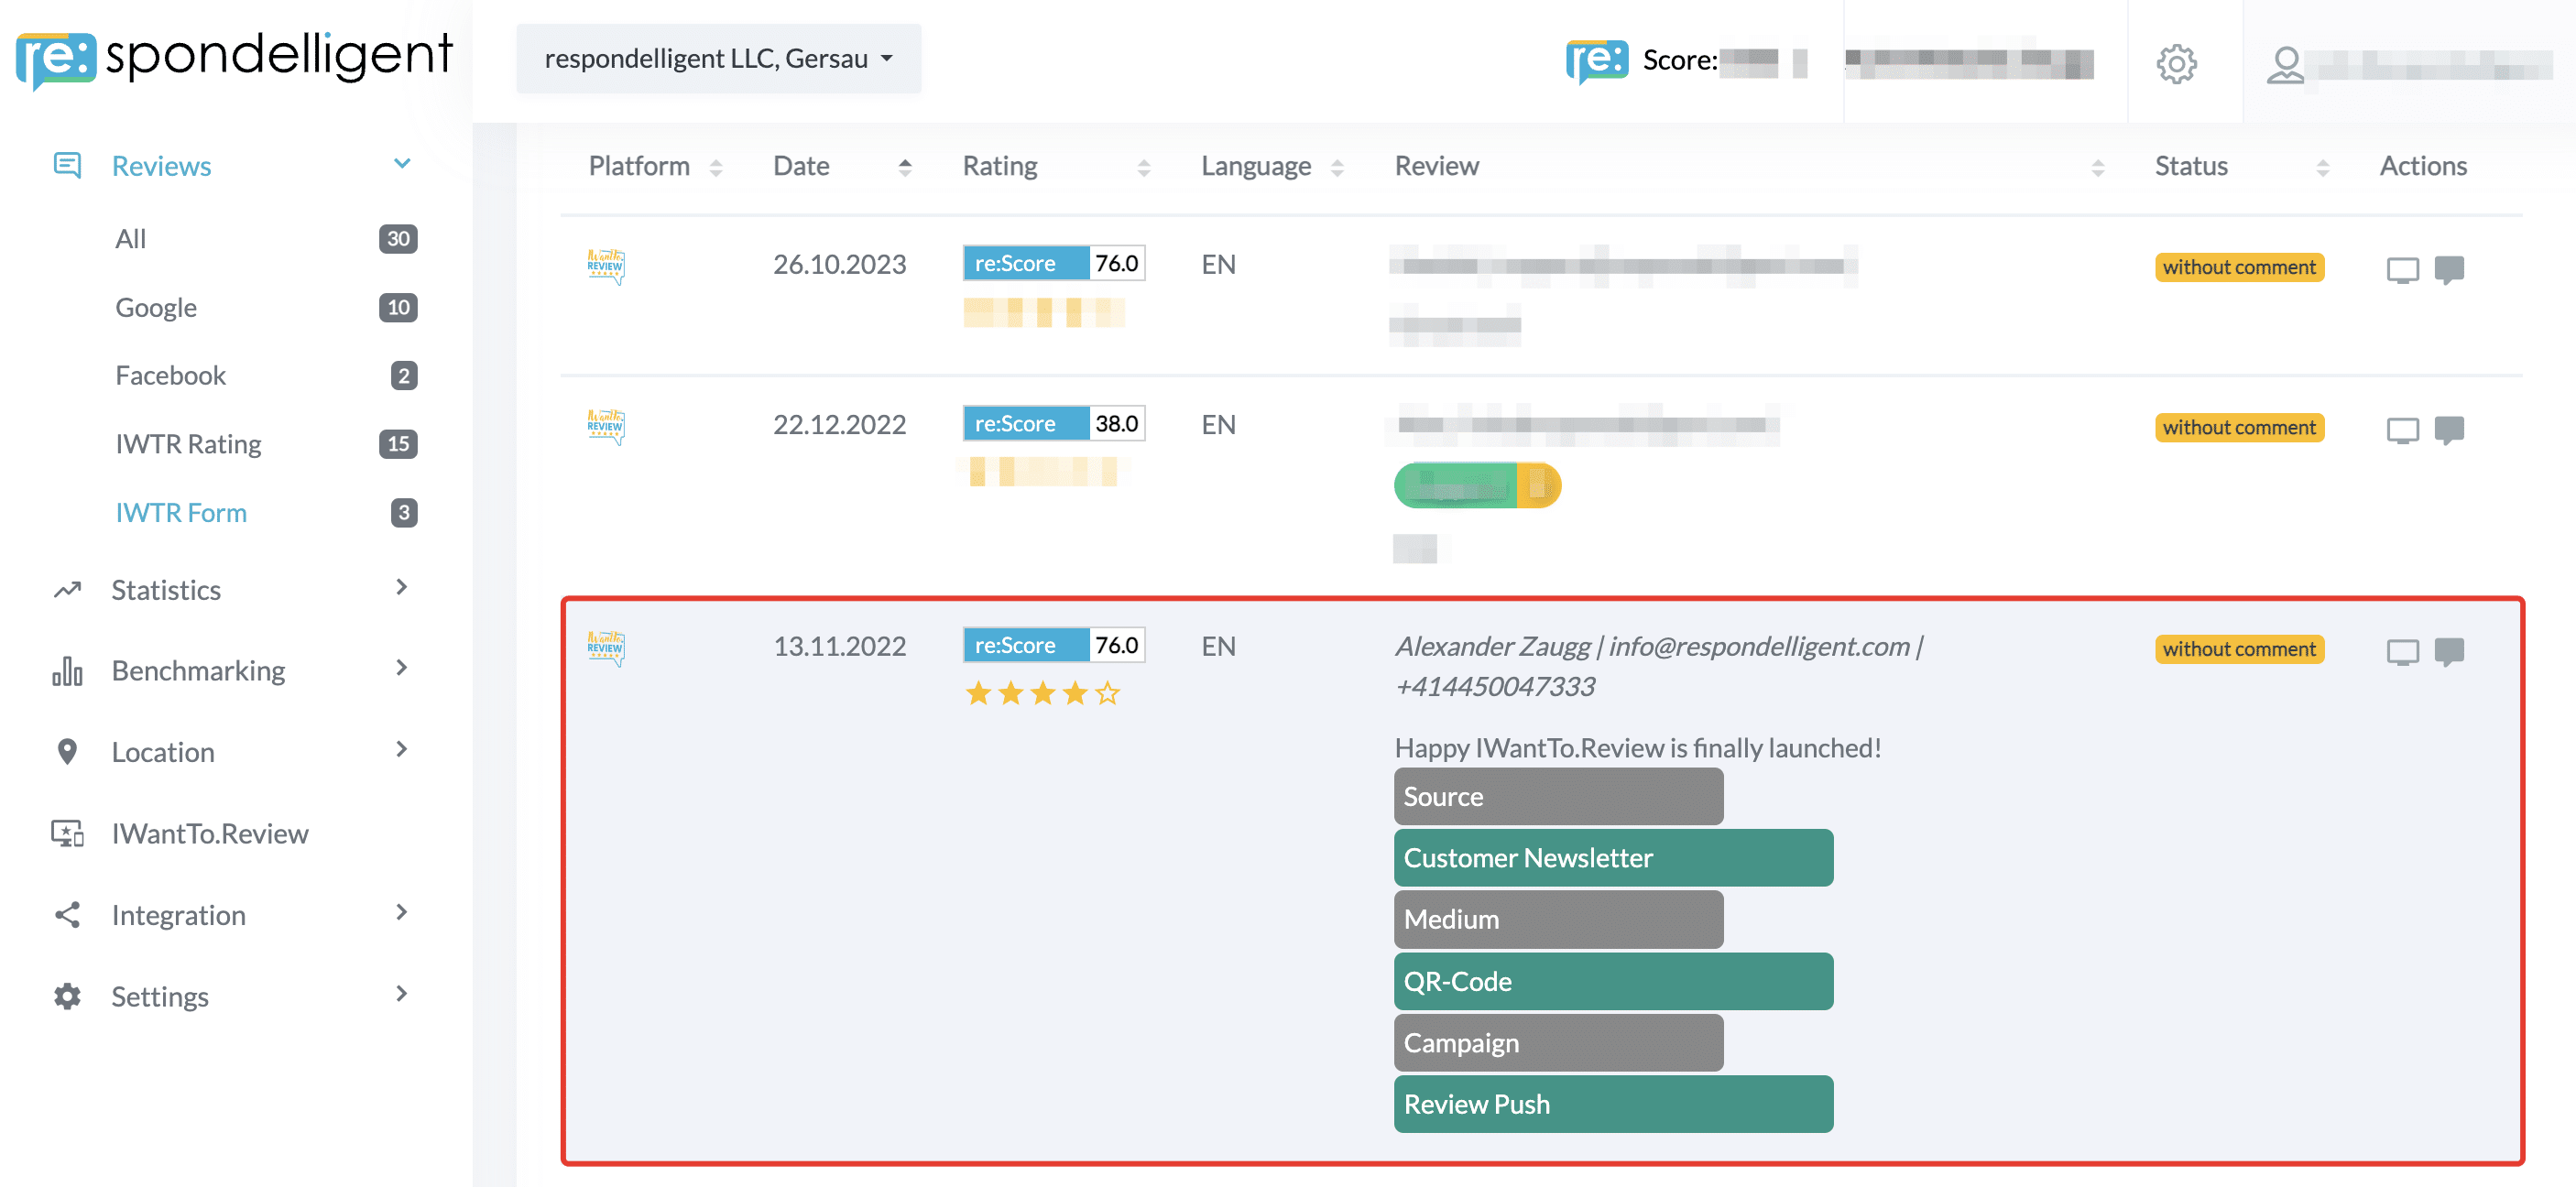
Thus, you can not only generate more reviews but also get more insights into the review behavior of your guests.
With our Google Analytics integration, you can use the collected visitor data from your IWantTo.Review page to create targeted marketing campaigns on Google and social media platforms. Read more about the Google Analytics integration.